GREAT LAKES HOPS

Hops BLOG

  • Home
  • Retail - Shop Now
  • Select Hops
    • Select Hops Program
    • Hop Sensory
    • Brew Group
    • Aztec™
    • Hydra™
    • Paradigm™
    • Bergamot™
    • Emerald Spire™
    • Gemini™
    • Mackinac™
    • Michigan Copper™
  • Select Hop Locator
  • Commercial Ordering
    • USDA Exclusive Hop Varieties >
      • Triumph
    • Availability
    • Commercial Contact
  • Hops Blog
  • Hops DOCS
  • FAQ

1/26/2020

Grower Notes: Common issues with new hopyards

Comments

Read Now
 

Download as PDF

No doubt about it, for many new growers hops are a difficult crop to grow well.   Fast growing hop plants require lots of balanced nutrients and water with critical timing of applications; making hops a real challenge to keep up with when compared to most other crops. Getting the hops to climb to the top trellis wire and produce fully developed side arms with lots of cones seems to be an unattainable goal sometimes. There always seems to be a guy named Murphy lurking around, ready to throw a wrench in the works; despite a hop grower’s best efforts.  Wind, rain, drought, and pestilence... yet there are lots of pretty pictures of hopyards and recorded harvest yields to show it is more than a dream.

​It is common to find in many instances, less experienced hop growers do not fully understand many integrated hopyard management practices and how plant nutrient availability and growth is affected.  This following discussion covers a few of the issues that have been identified as potentially holding back hop growth and yields.  These issues are gleaned from talking to, and working with hundreds of new hop growers and the challenges they have experienced.

​These observations and field notes are intended to educate and provoke deeper, more in-depth discussions amongst hop growers and grower groups.
  • Soil compaction, drainage issues
  • Improper soil pH, corrective actions
  • Drip irrigation, poor water quality
  • Understanding the importance of complete soil testing
  • Selecting the right fertilizers
  • Replacing depleted nutrients in the hop root zone
  • Removing underground rhizome growth
  • Weed control issues
  • Glyphosate use in a hopyard
  • Using black weed barrier fabric in a commercial hopyard
  • Tilling & cultivation schedules
  • Fungicide interactions with nutrients
  • Out-of-balance soil nutrients
  • Selection /management of cover crops
  • Scouting for pests and diseases
  • Checking for and controlling nematodes
  • Better knowledge of pests and hop pathogens and their controls
  • Protecting hop crowns and buds exposed to harsh winter conditions
  • Proper hopyard site selection
  • Mulches and compost application
  • Timing and depth of crowning, carping and bine mowing prior to training

​Soil Compaction (Back To Top)
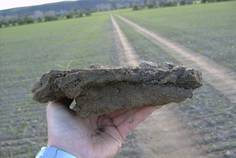
Picture© Precision Agriculture
​Soil compaction in the hop row from season-to-season is probably the most common problem encountered when consulting a hop yard. Many growers prep their new hopyard sites by plowing and amending the soil prior to planting but fail to do this practice in following seasons. Why? To help preserve a permanent row cover crop? Don’t have the correct and necessary equipment? Hopyards DO require specialized equipment to operate and maintain - - it is time for new hop growers to get on board with this fact.

Hops are the second fastest growing plant in the world and have to develop a massive feeder root system each season to support the amazing bine growth rate. A critical part of this hop root system is the fine fibrous feeder root system that re-forms each spring in the top 6 inches of nutrient rich topsoil. Individual feeder roots may only last for 5 to 7 days before being replaced by new ones in a continual process. The fine hair-like feeder roots spread outward from the central crown and larger permanent roots as the spring season progresses. Their function is to find all the necessary macro and micro-nutrients and transport them up the plant using lots of available water. Poor feeder root development and management translates to poor hop bine growth.

Roots only accumulate nutrients and water that come in direct contact with them. Anything that restricts a hop plant's root density results in less overall nutrient uptake. Most nutrient-collecting roots grow in the top 6 to 8 inches of soil because that’s where the microbes, nutrients, and oxygen are located. Nutrient uptake grinds to a halt if soil oxygen levels and exchange rates with the atmosphere are limited by soil compaction. It doesn’t matter if the soil test says all the soil nutrients are present and accounted for – the plant can’t take them up in sufficient quantities without the soil oxygen being present. The perfect rooting conditions are nutrient rich, well-aerated soils with adequate moisture present. This is sometimes referred to as a soil having good tilth. 

How can a compacted soil be corrected? First identify the ALL possible factors causing the compaction; then apply the best actions to correct it.
  • First, determine the soil type - Clay soils are notably finer than sandy soil and have limited air pore space between the smaller soil particles compared to sandy soil types. Clays also have a strong bond between soil particles caused by high levels of magnesium. The more clay content in a soil; the higher the probability of compaction. Annual freezing frosts naturally aid in reducing shallow compaction of clay soils in northern regions. Many hop growers "hill-up" their hop rows in several stages throughout the growing season; adding additional nutrients alongside each row. The nutrients are tilled into the soil and rolled toward the row center; on top of the rooting zone. This  annual mechanical tilling practice is somewhat comparable to hilling potatoes.
    In many cases, compact heavy clay soil aeration and drainage can be improved with a gypsum amendment. Gypsum naturally loosens clay soils with high magnesium levels. (Magnesium levels determine how tight or sticky a clay soil profile is.)  Gypsum is pH neutral on soil pH levels. 
  • Physical Compaction – Usually is caused by heavy tractors and other equipment in the field or working soils when they are too wet or dry. Note that most hopyard rows are spaced to accommodate tractor tire widths; so the most compaction occurs right alongside the hop rows. This can create very dense un-aerated soil conditions on both sides of the hop rows where feeder roots cannot penetrate or survive.
    The best time to work clay-content soils is when the clay crumbles in your hand. If it balls up or chalks out, it is best practice to stay out of the yard with the tillage equipment. Working hopyard soils at the wrong time has a compounding long term effect of reducing pore space > reducing oxygen> reducing microbial activity> reducing organic decomposition rates> reducing the production of soil organic acids> reducing the amount of nutrient availability> reducing plant growth rates.
    Hop plants respond best to having soil compaction removed by deep tillage done alongside the rows early in the season.  It is necessary to complete this springtime cultivation before the shallow feeder root system begins to form. If wet springtime conditions are common in your region, consider completing these deep tillage operations in the prior fall season when soil conditions may be more favorable.
    Side Note: Adding and incorporating decomposing organic matter to mineral-based soils helps raise soil levels of complex organic compounds, microbes, enzymes, and acids that increase availability of essential plant nutrients. This essential process is referred to as the humic acid cycle. It is very worthwhile to learn how this natural process makes healthier vibrant soils. 
  • Striated soil pH – a condition found commonly in agricultural field soils used in the past to grow mono-crops such as corn and beans in rotation for years, where lime was surface applied. This effect is simply described as a huge variation of pH levels between the shallow topsoil and subsoil regions. (Levels of pH 7.5 topsoil /pH 4.5 subsoil are not uncommon.) Hops have both deep permanent roots and shallow annual feeder root systems. Large differences of soil pH in each plant root zone can cause a seasonal stunting effect as the hop shifts from the low pH deep root system to the high pH shallow feeder root system. Plants may emerge normally in spring using the stored nutrients of the permanent deep roots but stall after the first initial upward push; as the plant fails to transition properly to the feeder root system. It results in stalled growth in severe cases and resembles transplant shock. Ideally this soil pH issue is identified by testing prior to establishing a hopyard.  Deep 18"-24" subsoil tillage can be done to help mix and break up the different pH layers. 
  • Hardpan- is a compacted field soil condition that form 12 to 18 inches below the soil surface from years of continuous shallow tillage for other crops. This compact layer stops deep rooted hop plants from establishing deep into the soil and limits deep root mass.  The corrective treatment for hardpan is the same as for striated pH above. In practice, it is best to do deep plowing and subsoil tillage prior to establishing the hop yard.

​Improper Soil pH (Back To Top)

The majority of commercial hop varieties prefer a slightly acidic soil. A soil pH of 6.2 to 6.8 works well for most hop types (there’s always exceptions). Soil pH in a nutshell, is simply a method of measuring soil acidity or alkalinity levels by measuring the electrical charges present. All soil minerals and nutrients carry either positive (cations+) or negative (anions-). Many are metallic - Iron, Zinc, Copper, Boron, Magnesium, Manganese, and so forth. When a soil pH is in electrical balance all the different nutrients are available. When it is too high(+) or too low(-), many different nutrients and processes are blocked and nutrients become less available to the plant. (Root surfaces also have electrically charged sites that match up with the different charged nutrients- kind of like a matched lock and key system). Improper soil pH slows down microbial activity and organic matter decomposition rates. A wrong soil pH coupled with the soil compaction cascade effect described above is a real growth killer. This is a very common issue in hopyards experiencing poor overall growth.
Picture
  • Raising soil pH - Is not as easy as dropping some agricultural lime on it. Application ates have to be calculated and a soil specialist should be consulted. Different rates of lime and/or gypsum may be required (or a mix of both) to keep the levels of calcium, magnesium, and sodium balanced. Too much lime/ gypsum bulk applied at once or over time can cause imbalances of other nutrients like magnesium, potassium, boron, zinc, and copper.  It is important to understand the difference between gypsum an lime and how each interacts in the soil. Gypsum is more pH neutral will  solubilize and leach downward in a soil profile more quickly than common lime. It also aids in dissipating leftover fertilizer salts. In comparison, agricultural limestone  is relatively immobile and only moves downward into the soil profile about 1 inch per year; so it is best to incorporate lime into the soil with tillage equipment. Hydrated lime is very reactive compared to regular ground field lime and should be used with precaution.
  • Lowering soil pH - is accomplished with soil-applied sulfur applications. It is important to know that sulfur applications can burn root tips and hair feeder roots. It is best practice to avoid heavy sulfur soil applications during periods of active new root growth. Applying sulfur to the field soil may be best done post-harvest and in multiple small applications versus single large applications. Sulfur is an essential plant nutrient and supplied at proper levels also has a fungicidal effect. Caution: Foliar-applied sulfur and sulfur containing products are  known to cause sulfur complexes in the brewing process; resulting in undesirable onion or garlic aromas and flavors. Therefore, probably best to avoid sulfur applications to hop foliage when cones are forming or present. 

​Irrigation Issues (Back To Top)

Picture
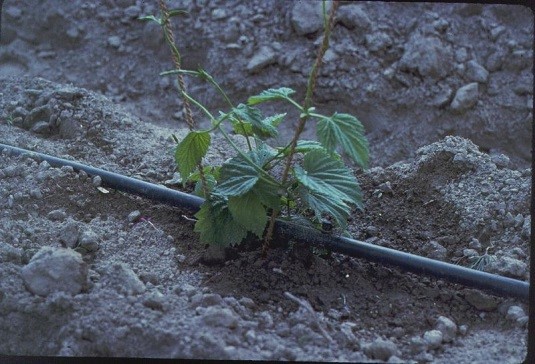
Irrigation is a lot more complex than most growers realize. Hops have both shallow and deep root systems and it is the shallow root system in the top 6 inches of topsoil that is responsible for most of the nutrient and water uptake during the short formative high growth phases of climbing the trellis and forming sidearms/cones. Most hopyards employ drip irrigation to deliver both water and supplemental plant nutrients. Choosing the right irrigation system design; how it is installed and operated are important issues. Here are a few of the common mistakes we have seen growers make.
  • Mismatched drip lines to water supply pressures and gallons delivered per hour by the water source. If the pump or well cannot support the flow rate required by the drip lines and row lengths, then drip line pressures are compromised and water delivery is uneven. A common visual symptom is that the hops get smaller the farther they are from the water source.

  • Wrong dripper gallons per hour (gph) drip line selected. Sandy soils should use 1 gallon per hour(gpm) drip line emitters, while heavier clay-based soils should use ½ gpm emitters. One gpm emitters on clay soils will supply too high a flow rate causing wasted runoff into the aisles; while conversely, ½ gpm emitters on sand soils will create small  wet spots with large areas of dry topsoil.  The water/ nutrients  rapidly perks straight down past the feeder root zone and takes the fertilizer with it. Either way, the fertilizer and water is not being delivered where the hops can use it. If the wrong ideal gph emitter drip lines have already been installed, then the the problem can be somewhat compensated by running shorter multiple irrigation cycles per day.
  • Wrong dripper spacing.  Emitter spacing on the drip tube should be matched to ideally create a minimum of two wet zones on each side of the hop plant.  Example: hops planted 36 inches apart should use drip tube with emitters spaced every 18 inches.  Hops plant at 48 inches would use 24 inch emitter spacing.  Mismatched drip emitter spacing delivers more water to some plants than the others in the row and results in uneven growth.
  • Using the same irrigation times for different hop cultivars, or placing different hops on the same watering zone.  Know your cultivars.  A big hop cultivar like Chinook takes a lot more water than a hop like Centennial.  If the Chinook is watered adequately, the Centennial will drown and rot. Use cheap inline irrigation valves and controllers to separate individual hop varieties.
  • "Setting and forgetting" the irrigation control system.  This means watering the same amount every day on the same schedule whether the plants require it or not. Day in and day out; a sure recipe for disaster. Times and cycles should be varied to prevent waste fertilizer salt accumulations, and watering should be reduced if the soil moisture levels are adequate. If fertigation systems with injectors are used, this includes checking the injectors, filters, and tanks frequently to be sure they are calibrated and functioning properly. Clogged filters, line leaks, and worn injectors are common finds in drip irrigation systems.
  • Checking for clogged in-line water filters.  These are often installed when using a surface water source like a pond or stream. The pump pressure gauge may indicate everything is OK when it is otherwise.  Install  pressure gauges before and after the filter to see how clogged or restricted it is.
  • Operating drip lines during the hottest part of the day. Water moves slowly thru drip lines and the lines are commonly black. On a sunny summer day the water temperature in a  ground-laid black drip line can exceed 120 degrees.  This hot water will cook any feeder roots it contacts. Try to schedule watering cycles early in the day to prep the hops for the hottest part of the day. If irrigation cannot be avoided during the hottest part of the day, then exposed water mains and drip lines should be opened and flushed until water temps are safe. (Be sure to turn off any fertilizer injectors while doing this.)
  • Operating irrigation into the evening and night hours.  Quite comparable putting a baby to bed with a wet diaper. Expect a lot of rash in the morning.  The high overnight humidity and moisture conditions create encourage rapid and severe disease development.  Best practice is to irrigate the hopyard early pre-dawn or morning so the soil surface and humidity reduce before nightfall.  If the irrigation pump/lines/ system is undersized and it is necessary to water around the clock, you should consider expanding the capacity of your watering system or be applying good disease prevention controls rigorously during these periods of use.
  • Keeping the soil continuously wet – 24/7.   Many hop pathogens are dependent of wet saturated soil conditions to thrive and spread.  Don’t help them.  Thorough watering cycles followed by a drying down period is far better than continuous water applications.
  • Running the yard too dry during critical high growth phases. Conversely, to being constantly wet; being too dry at times is equally bad.  During the high growth climbing and coning phases the hops require a lot of water to move all the nutrients required to push that kind of rapid growth.  If the shallow feeder root system goes too dry during these periods, the hops will stall growth and shock; often turning yellow from the bottom up.
  • Installing drip emitters right over the crown of the hop plant.  Bad idea because:  1.) The feeder roots are not located there . 2.) The continuous wet conditions around the central crown will create the perfect conditions for crown rots and pathogens like downy mildew.  Lay drip lines alongside the crowns instead.
  • Not knowing the quality of the water source.   Water sources can be contaminated, full of plant pathogens, or have excessive levels of sodium, chlorides, selenium, iron, boron, etc.  and levels can change seasonally.  Highly alkaline  or acidic water sources may need to be modified to make them useable.  Testing the water source is important in determining if corrective actions need to be applied and help determine proper fertilizer formulations and dosage. Water sourced from ponds and streams require filtration to prevent organic algae/microbes and particulates from clogging drip emitters.  Planning larger hop yards usually includes installation of groundwater wells to avoid the headaches of surface water filtration/ purification.

​Complete Soil Testing (Back To Top)

Many hop growers do not realize the value of accurate and timely testing of their soils in their hopyards. The goal of all soil testing is to inform the grower of what nutrients are available at the beginning of the growing season; middle of the season, and what is left at the end of the season.  These test help identify nutritional problems before they cause problems and what needs to be replaced or amended.  It is strongly advised for inexperienced new growers to do testing three times during the season.  A complete soil test includes soil pH, alkalinity, organic matter, macro elements, microelements, cation exchange capacity (CEC), and cation saturation. A foliar test should also show the complete range of elements; not just N-P-K levels.
  • Hops require different levels and balances of nutrients at different growth stages during the season. For example: Phosphorus is critically important in early spring for new root development; at burr onset; and rebuilding energy going into winter.  Nitrogen is essential during the climbing and side arm development stage; but not during cone maturation or during preparation for winter dormancy. Extra zinc and boron are specifically required at burr initiation.
  • Spring testing: Shows what the general levels are of all nutrients and soil pH going into the season. Do this test before the first major round of spring hopyard cultivation. This allows time to incorporate  slow-acting amendments like lime, sulfur, or gypsum.
  • Mid-season FOLIAR testing: do this preemptive test just prior to bine sidearm initiation.  The goal is to identify if the essential nutrients like potassium, zinc, and boron are being taken up in sufficient quantities to set burrs and cones for maximum yields.  If the foliar test shows deficiencies there is still time for quick corrective amendments or foliar fed nutrients to save the day. Compare the foliar test results to the last soil test to determine if there is a deficiency in the soil or if there is a nutritional imbalance that is causing plant uptake issues.
  • Post-harvest soil testing: Shows what nutrients were removed by the hop crop and losses to leaching, and what needs to be replaced going into winter dormancy.  Specifically check the N-P-K levels, sulfur and organic matter content. If soil pH or compactions are identified as issues, early fall is a good time to apply corrective amendments like phosphate, potassium, lime, and gypsum. 
For more information on soil testing, please find a text book like "The Basics of Understanding Soil Fertility and Soil Testing" or consult  with professional grower services and suppliers.

​Fertilizer Issues (Back To Top)

Picture
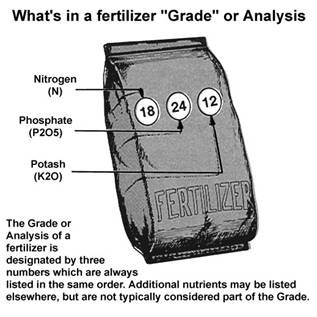
Selecting and applying the right combination of fertilizers is a definite grower skill.  It requires knowing the soil profile/pH, the irrigation water quality, the individual hop varieties, understanding soil/foliar tests, and some pretty complex nutrient interactions. Successful hop growers find that applying a combined program of organic, granular, and drip line fed soluble fertilizers at appropriate times of the growing season is the most successful. Hops have high uptake requirements for many micronutrients besides the major N-P-K elements. If any of the minor elements are deficient, hop growth is compromised. Many growers use additional foliar-fed fertilizers with micronutrients at key stages of hop growth as insurance against having a micronutrient deficiency. Here are a few common fertilizer issues that have been encountered.
  • Surface application of nutrients vs. deep spring tillage with incorporation of new nutrients. Applying replacement nutrients year-after-year to the soil surface without tilling/incorporation creates a very shallow root system.  (In hopyards using weed control mat, the root system can actually be right at the soil surface.)  Early spring deep soil cultivation done as the hops emerge to ensure a deeper nutrient-rich rooting bed. This is desirable because hops with deeper root systems can handle adverse growing conditions such as heat-stress and drought far better than shallow rooted plants.  Deep tilling on either side of the hop row has to be done early in the season, before the new shallow feeder roots form.  Deep tilling close to the plants after the hops are 4 to 5 feet tall is counter-productive because of the amount of damage to the feeder root system forming around each plant. Incorporating granular soil amendments during later stages of plant growth is done by rolling soil from farther out in the aisle towards the row without disturbing the soil right next to the plants.
  • Selecting the wrong nitrogen source for the time of the season.  Most fertilizers containing nitrogen are formulated with two types: nitrate and/or urea.  Both are water soluble sources of nitrogen but nitrates can be used more directly by the plants, while urea has to be converted by microbes first.  Either nitrogen source if over-applied can cause disease outbreaks and inhibit uptake of other nutrients like zinc and copper.  Synthetic nitrogen fertilizers also lower levels and burn out existing beneficial soil microbes and lead to increased soil compaction. Urea applied early in the season before the hop feeder roots form is often of little use to the hop plants because - 1.) High leaching rates and 2.) The soil microbes that convert urea are relatively inactive in the cold soil conditions. 3.) Urea applied to cold saturated soils will convert to ammonia; which will burn back any new roots. It is better to wait and apply urea formulated fertilizers after the soil temps rise into the 60’s and the soil biology is more active. A better set of choices is to first apply a jumpstart low level of organic fertilizer or manure to increase microbial soil activity that can then break down the later-applied urea more efficiently, or apply nitrate-based fertilizer  that the plants can utilize without microbial conversion. The emerging first flush of spring hop growth primarily utilizes energy stored as sugars and carbohydrates in the overwintering deep roots until the hops reach a height of about 6 to 8 feet. At the point where the stored energy has been depleted, the newly formed shallow feeder root system takes over collection of new nutrients to push bine growth up the string to the top. This transition from one root system to another is what makes the difference between hops that reach the top wire and hops that stall growth at 10 to 12 feet.
Some growers have also found an incorporated granular application of a sulfur-coated urea (SCU) applied after the hops are about a foot high to be beneficial.  The sulfur coating meters the urea release, reducing leaching and ammonification, and also has some beneficial fungicidal effects. Applying liquid organic humates as soil drenches or via drip line injection in early season is also beneficial in many mineral-type soils with low organic content to help release  bound soil nutrients from soil particles.

  • Selecting the wrong N-P-K and micronutrient package in the fertilizer formulation.  Selecting the right mix of nutrients can only be done after analyzing a complete soil and water test that includes organic matter content and the micro elements.  Examples:  Applying a calcium-based fertilizer when soil Ca levels are already high and magnesium levels are low;  or having too much or too little Boron. See the GLH soil fertility blog for more info about interpreting soil tests or consult a professional agricultural crop specialist in your area.
  • Applying a fertilizer directly to the hop crown. A recipe for a disease outbreak.  The roots are not located there.  Always apply fertilizers around the hop plant. Having high excess nitrogen levels in the hop crown region any time of the year is bad cultural practice.

  • Not matching the quantity and type of fertilizer with the right phase of growth.  Emerging hops do not require near the level of fertilization as when they are climbing aggressively and producing sidearms and cones.  Many growers add a supplemental side dress of granular fertilizer as a booster just prior to these critical high growth phases.  Being too low during these  high growth phases will stall growth and nutrient-deficient plants will turn yellow from the bottom up.
  • Urea plus high growing temperatures equal stretched soft growth. Nitrate nitrogen tends to make shorter stockier plants. Growers can alternate nitrogen sources to effectively control plant habit and internode length (the stem length between leaf sets).  Plants that are too lush from excess nitrogen rates and blow past the top of the trellis often yield less than plants that fall just short of the top wire.
  • Feeding excess nitrogen after the cones have half formed.  Hops find it easier to make chlorophyll than oils and resins when extra nitrogen is available. Chlorophyll tastes like grass. Beer that tastes like grass doesn’t sell well. Period.  Best alpha and oil levels are achieved by leaning out the nitrogen at the hal-formed cone development stage.  Too early a cut and sidearm length is reduced with fewer cones.  Too late equals grass. Seeing a few yellow leaves at the bottom of the hops as cones finish developing is actually a good sign at this stage. Heavy clay soil hopyards can cut back nitrogen levels harder than yards with sandy soil types. *Do not cut back on the potassium or other micronutrients. The hops need all these nutrients to max out the resins and oils.
  • Fertigation continuously at the same irrigation cycle time and frequency.  Water soluble fertilizers that are applied through a drip irrigation system for the same daily time period can create high levels of concentrated waste salts; especially during periods of low rainfall. Example: potassium chloride is a fertilizer source of potassium. The plant takes up the potassium and leaves the chloride salt behind. These salts accumulate at the edges of the wet zone created by the drip emitter.  It resembles an underground pot with walls of concentrated salt. The salts effectively burn off any roots trying to cross it to reach the water and nutrients inside the wet spot.  The effect is that the hop plant cannot reach or take up the water or nutrients across this high-salt zone and the hop plant will stall growth and shock.  It is important to break up this concentrated salt zone by clear water flushing for longer  irrigation times during the weekly watering schedule; especially during hot periods coupled with high growth rates and little rainfall.

​Annual Nutrient Replacement (Back To Top)

Picture
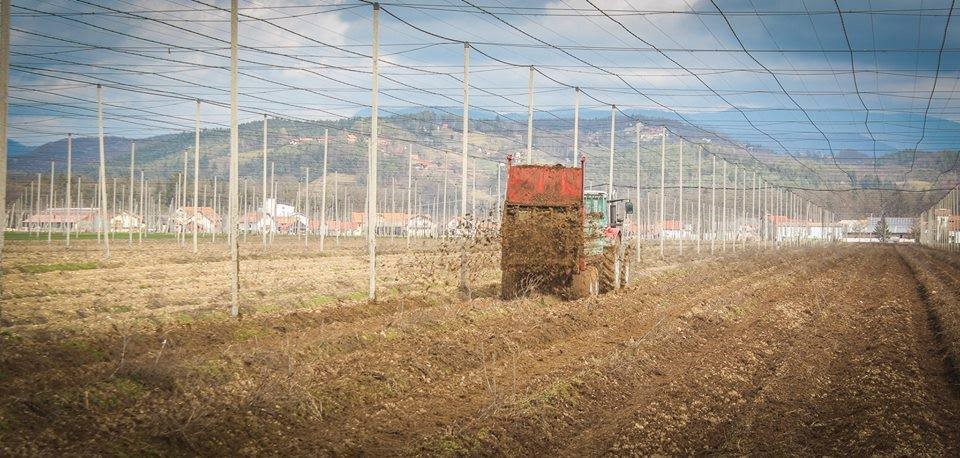
Hops are like a big nutrient-sucking vacuum cleaner.  The shallow feeder root system is very dense and very efficient at scavenging all the nutrients from the surrounding topsoil.  Each year the hop crown grows larger and requires more nutrients than the year before.  Only by limiting the size of the crown and root structure in mature hopyards can overall nutrient needs be stabilized.  In the wild, hops deplete soil in one area and physically move to new areas via long, spreading rhizomes. Replacing the depleted nutrients removed each season from the hopyard soil is a major challenge for hop growers. Growers should have a complete post-harvest soil test done to see what the real rates of nutrient depletion are. It is best practice to apply soil amendments in several smaller applications versus a single bulk application each season. This avoids the potential of blocking balanced uptake of other nutrients. 
Ongoing annual replacement of nutrients should be considered a year-around continuous effort.  The goal is threefold : 1.)To replace the depleted nutrients with balanced long term sources; rather than reactive quick fixes. 2.) To increase the nutrient holding capacity of the soil. (CEC)  3.) To rebuild soil organic matter and increase soil microbial activity to improve nutrient conversion and efficiency. Both are essential to the humic acid  cycle and good soil tilth.
Many soil and plant processes are interdependent on the balance of nutrients in the soil and plant. Too much of one nutrient will block uptake of another. Too little of another element will stop a complex conversion process.  It is easy to mess this natural balance up. Here are a few things to avoid.
  • Do not feed hops only with synthetic fertilizers – granular and / or water soluble.  It is well documented that using only synthetic fertilizers will reduce and destroy the soil microbe levels necessary to efficiently convert nutrients to forms usable by plants.  Hop growers are faced with having to use high levels of synthetic N-P-K fertilizers during high growth stages to get maximum yields. Pure organic fertilizers simply cannot provide quickly enough the the high level of nitrogen hops demand during the climbing and coning phases of development. This creates a situation where often very high relative levels of synthetic fertilizers are being applied continuously long term to a hopyard soil during peak growth periods. The potential for soil organic matter burn out and reduced microbial activity is large. This leads to breakdown in the humic acid cycle, soil compaction and reduced nutrient availability issues.
The best management practice is to use a mixed approach to hopyard fertility. Use organic fertilizers whenever possible to help rebuild the soil organic matter and microbe levels. A set of good practices is to apply incorporated manures early spring and/or postharvest; with annual aisle cover crops to build biomass during the growing season. Here are a couple of tips to get it right:
  • Avoid over-applying fertilizers, composts, and manures in one big shot.  Soil microbes can only handle just so much at a time and large excess quantities can slow, block, or even damage soils and nutrient availability.  Large percentages of nutrients are lost to leaching and volatilization and may end up in nearby surface waters. Plants can use nutrients far more efficiently if they are applied in multiple applications. Be a good steward of the land.
  • Using the wrong fertilizer placement.  Some nutrients like phosphorus and lime do not percolate readily down into the soil profile and need to be incorporated to be dispersed, available and effective.  Granular fertilizers containing urea should be incorporated immediately after application or large amounts are lost to volatilization. Again, never apply fertilizers directly over the hop crowns. High excess nitrogen levels in the hop crown encourage disease outbreaks.  Always apply fertilizers around or alongside the hop crowns.

    Since most of the soil nutrient depletion occurs in the hop row, this is where nutrients need to be monitored and replaced annually. A common set of seasonal practices  to prepare the hop rows would be:
  1. Plow/disc back 6 to 8 inches deep on both sides of the row in early spring (or late fall) while the plants are still dormant; to roll away the depleted topsoil into the aisle way. This has to be done very early; before the shallow fibrous hop feeder roots begins its growth for the season.  A sharp disc or plow/coulter combination is commonly used to cleanly cut any rhizomes free from the crown at the same time.  The cut rhizomes are then removed from the hop yard.  A shallow trench has now been created on each side of the remaining 12-14" center row.
  2. The remaining center row strip is next topped or trimmed tightly to the ground when the first bull shoots emerge and prior to the second flush of bines.  These first shoots, weeds, and old dead bines is removed; leaving a clean weed-free center row. This debris will later be incorporated and buried when fresh nutrient-amended soil is rolled back against the row.
  3. The depleted rolled back row soil (now in located in the aisle) is then amended with all the necessary replacement nutrients, compost, manure, etc. to recharge it.  This freshly-charged soil  is thoroughly mixed using a disc and is rolled back towards the hop row; eliminating the trenches made in step one.  This creates a nice aerated  uncompacted soil rooting bed full of new nutrients for the hop feeder roots to form in for the coming growing season.  
  4. The hops are next strung and trained as soon as the bines start showing a hooking twist at the tips.  Another light shallow soil cultivation operation is done after bine training to remove any new compaction caused by training activities.
  5. As the early season progresses, the aisle ways between the hop rows are periodically tilled when seedling weeds reach 2 to 4 inches in height. (Always till before any weeds are mature enough to set seed.)  Each time a hop yard cultivation occurs, more aisle soil is thrown against the hop rows to smother new emerging weeds and incorporate any banded fertilizer applications. This continues adding fresh nutrients and fresh loose aerated soil to the rooting bed as hop growth accelerates into the growing season.
  6. Some growers then overseed the aisles with annual cover crops such as a combination of buckwheat, rapeseed, and field radish for the rest of the season to help smother late-emerging weeds.  These annual cover crops also function to keep the yard cooler during the hottest months of the year and to help maintain the soil organic matter content.  Most annual cover crops grow quite tall and should be mowed shorter (6") when cooler, wetter  fall weather conditions  return/occur.

​Rhizome Management (Back To Top)

​Hops produce shallow underground budded runners called rhizomes.  These are not roots. (Hop roots are white and do not have latent buds).  Rhizomes naturally function to allow a hop plant to continually spread outward in the wild; searching for favorable locations to re-establish.  In commercial cultivation of hops these  unwanted rhizomes have to be removed annually or semi-annually to keep the hop plants from spreading into the aisles.   If the rhizomes are not removed, they divert energy from the crown and the climbing bines, resulting in lower yields of hop cones. The hopyard tillage steps described above are recommended for timely early spring/ late fall rhizome removal.

​Weed Management (Back To Top)

  • Do not allow weeds to mature and set seed.  Weeds are prolific producers of seed; often producing thousands of seeds per plant.  Many weed seeds continue to ripen and become viable even after the weed plant is cut or pulled.  Growers that allow weeds to set seed face up to a thousand fold increase in weeds the next season.  Always control weeds before they set seed. Good weed control programs use a combination of the following:
  1. Mechanical tillage on a timely basis
  2. Pre-emergents to eliminate weed seedlings as they germinate and sprout.
  3. Post-emergent contact sprays.
  4. Using specialized systemic herbicides to control perennial weeds and grasses. Examples: Glyphosate (Roundup) and  Volunteer (clethodim).
  5. ​ Proper use of annual cover crops used to smother sprouting weed seeds.
Picture
Proper weed control. Photo courtesy The Top Hop
Picture
Poor weed management

  • Maintain/ mow tall grasses and weeds around the hopyard.  Tall perimeter grasses are a harbor for hop borers and armyworms.  Ideally maintain a 30 foot wide mowed perimeter around the hopyard.
  • ​Avoid using a permanent weed barrier fabric in the hop rows.   A horrible idea in a long term hopyard management plan for multiple reasons.
  1. Rhizome removal becomes impossible, unless the weed barrier is removed annually.
  2. Rebuilding the depleted soil with organic matter and fresh nutrients in the hop row is impossible.
  3. Adding corrective incorporated amendments like phosphates and lime are limited.
  4. Application of soil drenches for nematodes and fungal pathogens is limited.
  5. Black weed barrier literally cooks the shallow hop feeder root system during hot mid-summer conditions.  Soil temperatures above 95 degrees shut down feeder root functions. Tomatoes may like it; hops do not.  The fabric barrier tends to make hops grow a very shallow feeder root system that is exposed.
  6. Weed barrier fosters wet, warm, and humid soil conditions under the fabric that results in significantly higher levels of water molds, mildews, and root rots in hops.
  7. Plastic weed / mulch films can limit soil oxygen exchange; reducing biological activity deeper in the soil. 
  • Avoid misapplication of glyphosate.  Hops are very sensitive to glyphosate.  Glyphosate can be used in a hopyards only under very specific conditions.  Hops take months to grow out of  glyphosate injury. 
  1. Use generic glyphosate without any enhancers or additives. Use at label rates only.
  2. Only apply as an overall hopyard spray application in early spring or late fall if hops are fully dormant and crown buds are fully covered with at least an inch of soil.
  3. Do not apply it alongside actively growing hops with wet soil conditions when the shallow feeder roots are present; they will absorb it.  The plants may not die completely, but the hop crop is shot for the year.
  4. Do not spray emerged sprouts from rhizomes. They will translocate the glyphosate back to the parent crown and damage or kill it.
  5. If applying glyphosate as spot sprays use a spray shield to prevent any drift.  Do not apply to the soil as a heavy coarse spray or drench. The shallow hop roots will absorb it.
  6. Apply pre-emergent weed controls very carefully. Correct  equipment calibration and placement is essential.  Do not drench in heavily or hop feeder roots will absorb it.  Do not apply pre-emergents to hop rows and then incorporate it with tillage or hilling operations.  Read the labels carefully and fully.  It is important to know that hops only  tolerate pre-emergents. Misuse can stunt or kill even established hops. Do not apply to hops less than 2 seasons of maturity.
  7. Do not apply contact/desiccant herbicides such as pelargonic acid or Aim to hop bines until all trained bines have matured the bottom 3 feet into brown woody stems or severe damage will occur.  Usually applied in two or three seasonal applications. First application is directed downward alongside the  rows. Second and third applications are directed more sideways to burn off lower hop leaves.

​Tillage Techniques (Back To Top)

Picture
Hops annually form a dense shallow feeder root mat structure as the growing season progresses.  It forms in the top 6 to 8 inches of soil.  This feeder root system is responsible for absorbing all the water and nutrients required to push the hop up the twine once the permanent deep roots have exhausted their stored sugars and carbohydrates used for spring emergence.  Tilling too close, too deep, or at the wrong time can severely stunt the growth of hops. Here are some tips.
  • ​Complete all deep cultivation of soil adjacent to the hop rows before hops reach 1 foot tall. The new feeder roots are not formed yet, so soil cultivation can go deep and close to the crowns.  Most growers maintain about an 14-18 inch row width. Rhizomes are removed during this operation, also. The soil is rolled away from the hop row,  cutting and exposing the unwanted rhizomes.

  • Raise the depth of cultivation with each successive tillage as the season progresses.  By June, most shallow feeder roots are fully in place and the soil immediately adjacent the hop plants should be only tilled an inch or two deep to avoid damaging the feeder roots.   Many growers prefer to shift over another layer of soil from the aisle, slowly building a hill over the feeder roots, instead of risking damage to them.  Growers that have damaged the feeder roots find the hops will stall upward growth and shock; turning yellow from the bottom up. Hop recovery is slow and some cultivars may not recover quickly enough to cone properly.
  • Damage caused by rotary tillers. (Weed badgers , Buffalo tillers) These types of tillage equipment will spin up rhizomes and yank them from the crowns.  This often splits and damages the crowns, allowing easy access for crown rots, decay, and other pathogens.  Side cut hop rows first with a sharp disc blade to cleanly cut rhizomes loose from the crown structure before using this type of tiller equipment.
  • Don’t work the soil when it is too wet or too dry.  Soil structure can be severely damaged and take years to restore (especially true in heavy clay soils). Best to stay out of the yard with tillage equipment until soil conditions are right.  Soil compaction is one of the major limiting factors in a hop yard. Don’t add to it. If severe compacted soil conditions already exist consider seasonal gypsum applications as a corrective measure.

​Fungicide / Nutrient Interactions (Back To Top)

Many fungicides applied to hopyards contain metallic compounds, oxidizers, and acids that affect plant nutrition. Here are a couple of the common interactions encountered.
  • Copper toxicities and nutrient blocking from over application of copper-based fungicides. Excess copper sprays and soil drenches can effect phosphate, zinc, and iron uptake and create deficiencies.  Know your soil copper levels before adding more. Zinc levels should always be higher than copper levels. Beware that repeated heavy copper foliar sprays prior to and during burr initiation can create temporary zinc and phosphorus deficiencies and reduce total cone set and yields. A case of petting the puppy to death.
  • Using phosphites (also known as phosphorus acids) as replacement for phosphate fertilizers.  These products sound like they both supply phosphorus but they are quite different.  Phosphites have a biocidal and fungicidal effect and are properly labelled and used as fungicides; not fertilizers.  Phosphites compete directly with phosphates and are taken up equally by plants. However, phosphites break down very slowly in a plant and occupy sites in the plant cells that ordinarily use phosphorus. This limits all the important functions that phosphorus plays in plant growth.  In short, when using phosphites be certain that adequate phosphate is present to maintain a proper balance between phosphites and phosphorus to avoid a deficiency.  Never substitute a “fertilizer” containing phosphites for a true phosphate fertilizer.  Having adequate phosphate present also goes for when phosphite drenches are used in the spring for downy mildew control. Adequate phosphorus availability at this time is crucial for new root development.
  • Using phosphites POST-HARVEST  in hopyards with existing downy mildew infection seems promising. Downy mildews move into the hop roots, crowns, and buds to over-winter.  Phosphites are somewhat unique in that they will translocate downward in plant tissues and roots.  To be most effective they should be applied as a drench relatively soon after harvest is complete.   Phosphite takes 3 to 4 months to slowly break down completely, and has good downy mildew fungicidal and protective properties; so a post-harvest drench application could potentially provide effective downy mildew protection through the fall, winter, and even into early spring.  Time the application before the hops enter dormancy or preventative control will be limited in value. 

​Out of Balance Nutrient Interactions (Back To Top)

Plant nutrients and soil particles carry specific electrical charges and nutrient availability for plant uptake is a complex interactive process, to say the least.  There is a wealth of technical information on the subject of plant nutrition and it would take a Rhoades scholar to interpret it all.  Here are a few of the interactions that have been identified. Use this information to help spot potential out of balance issues in soil and foliar tests.
  • Decomposition of organic matter by biological activity releases organic acids and enzymes that interact with soil colloidal particles to release available nutrients. This is commonly referred to as the humic acid cycle.  Levels of organic matter decline annually in cultivated field soils and it is a challenge simply to maintain and replace organic matter levels depleted each season.  Without organic matter biological activity grinds to a halt and nutrient availability drops off.
  • Compacted soils create anerobic low oxygen soil conditions and microbial activity is  reduced and nutrient uptake is then also restricted. High levels of synthetic fertilizer salts are a major contributor to soil compaction.
  • Phosphorus availability is restricted by lower soil pH combined with high level of soil aluminum, iron, and zinc.  Excess phosphorus blocks zinc and copper uptake in hops. This is a very common imbalance in agricultural field soil tests. 
  • Potassium can be blocked by excess soil calcium, magnesium, and sodium levels. Excess potassium blocks boron, calcium, and manganese.
  • Calcium in general will loosen most soils and make nitrogen more available. Excess calcium can block about every other nutrient; especially magnesium, potassium, boron, zinc, and copper.
  • High Sodium levels in soils and irrigation water create toxicities in dry arid soils by reducing biological activity and reducing water uptake by roots. High sodium levels combined with high potassium levels blocks manganese availability. Soil compaction levels can become severe.
  • Nitrogen availability is limited any time soil microbial activity is reduced. Excess nitrogen can induce zinc, sulfur, and copper deficiencies; burn out organic matter and soil microbes. Nitrogen and sulfur combine to leach out calcium. Out of balance excess nitrogen is common in hopyards due to the high application rates.
  • Sulfur aids in microbial decomposition of organic matter. Sulfur combines with and leaches out excess calcium and magnesium. Excess sulfur creates a lowering of soil pH and can burn root tips.  Sulfur also has a fungicidal effect.  
  • Zinc is an important micronutrient in growing hops. Zinc levels should always be higher than copper levels. (Harder to do than thought if copper-based fungicides are used frequently.)
  • Manganese helps set and hold hop cones.​ Excess manganese blocks iron uptake if iron soil levels are low. Cones shatter at harvest> check MN levels
  • Iron rapidly becomes unavailable at high soil pH levels.  Wet, cold soils often create iron deficiencies. Nutrients bind tightly to deep soil colloids containing high iron.  Organic acids (humates) and enzymes produced by biological activity in the topsoil leach down into the deeper soil profile and make these nutrients soluble again.  Thus organic matter content in the topsoil is critical for deeper nutrient availability.
  • Copper (and boron) are disease fighters. Soil types with organic matter above 5% can have copper deficiencies. Excess copper affects zinc, phosphorus, and iron uptake.
  • Boron is necessary for optimal nitrogen conversion. It leaches easily and needs to be replaced in most hopyards annually. Brittle hop bine tips that break easily during training are an early sign of a possible B deficiency. However caution applying corrective boron as it can easily be over applied to toxic levels.

​Cover Crops in a Hopyard (Back To Top)

Picture
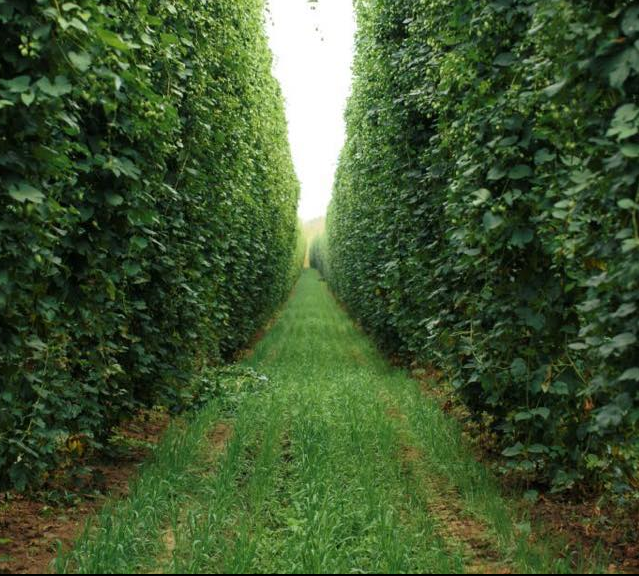
Cover crops are making a comeback in agriculture. Annual cover crops are used in agriculture and hopyards to:
  • Scavenge nutrients using deep rooted cover crops such as field radish. Immobile minerals like phosphorus are moved deeper into the soil profile when the cover crop is tilled under and leaves stems and roots decompose.  Deep-rooted Daikon field radish used as a cover crop is a perfect example of this.
  • Increase soil organic matter and biological activity. Just like above, the cover crop has to be tilled under to be beneficial. This practice aids in replacing depleted organic matter lost each growing season. Humic acids are produced.
  • Provide beneficial effects against plant pathogens.  Plowed under barley residue has beneficial fungicidal effects. Yellow mustard breaks down into a natural nematicide when tilled under. Biodiversity in the hopyard is enhanced.

  • To smother competitive weeds and grasses. Broad foliage cover crops can be selected to smother weed species that are becoming increasingly herbicide tolerant.
  • To provide a cooling effect during the hottest weeks of the growing season.
  • Legume cover crops can be grown to fix nitrogen in depleted soils. Most of this nitrogen is made available to hops only after it is plowed under and decomposes.​

​Pests and Pathogens of Hops (Back To Top)

PicturePhoto courtesy Great Lakes Hops Labs
There are complete books written on this subject and it is best to defer to them, rather than rewrite them here. However, here are a few things hop growers need to know that may not be clearly presented in books as it pertains to hops production:
  • Many hop fungal pathogens require wet leaves or saturated soils to flourish.  Don’t help them develop by creating prolonged wet leaf conditions or overly wet saturated soils.  There is an old grower saying: “Don’t send plants to bed wet”.  Ideally, leaves and surface soils are not wet during night time hours.  Saturated soil does not necessarily mean the whole field.  Drip irrigation system operations and schedules that create continuous wet saturation zones around the hop roots is simply asking for trouble.
  • Foliar infection and spread of mildews should be thought of as a two-event process.  Foliar leaf infection occurs at a first event where the moisture level duration is long enough to allow spore germination. This initial spore infection process is invisible to the naked eye.  The initial infection develops and colonizes the host. A second moisture event causes the mature fungal colonies to reproduce a new generation of spores (now suddenly very visible); where upon the hop grower goes into full panic mode. Repeated curative controls are the only remedy and the damage is irreversible. The key is to apply preventative protective controls before the first moisture event to prevent the initial infection. This means watching the weather forecasts closely to know when the right "wet leaf" conditions are predicted.
  • Downy mildews follow the sugar. Seasonally, downy mildew tends to invade the parts of the hop plants with the highest sugar and carbohydrate content.  In the spring it is the new hop shoots; during summer it is hop leaves, at harvest it is cones, in the fall it is crowns, roots, and newly-formed buds.  Scout and apply preventative controls to these locations early in anticipation of pathogen infection.

  • In general, the strongest systemic chemical controls are applied early in the growing season and controls shift to progressively weaker contact-only controls as cone harvest approaches.  Hops are a food crop and almost all chemical controls have cutoff dates for restricted use prior to harvest. Know these cutoff dates for each control used.
  • Don’t leave hops naked without protection leading up to harvest.  As mentioned above, most controls have cutoff dates. The idea is to apply these protective controls just prior to the last cutoff date so they are effective up to cone harvest.  Nothing is worse than watching a good hop crop get ruined by insects or late diseases and not being able to apply a control because it is too close to harvest.  Example: Two applications of Quintec (powdery mildew control) applied at burr initiation and mid-burr stage 10 days apart will help protect the hop cones with its residual effect up to harvest time.
  • Use broad spectrum horticultural mineral oils early in the season.  Cheap and very effective against all stages of  spider mites and fungal spores and exposed mycelia.  Do not apply horticultural oils on parts of a hop plant that have burrs or cones; it will severely burn and damage them. Check out a good manufacturer’s website like JMS Stylet oil for more exact do’s & don’ts of using oils.
  • Control Japanese beetles when they first appear.  Female beetles emit pheromone scent trails that attract more beetles from downwind.  Controlling them early in the yard early means stronger scent trails are established outside the hopyard and beetles will follow those routes instead; leaving the hops alone.  Japanese beetles also prefer plants like grapes and rose-of sharon bushes over hops.  Consider planting these kinds of plants at ends of hop rows as a trap plant which can be treated with insecticides separately from the whole hopyard.  Check these plants first when scouting the hopyard. hops can also be "camouflaged" by spraying them with citrus oil products like Prev-Am.
  • Hop aphids overwinter on cherry trees.  If your location is has native wild chokecherry or other prunus species nearby consider removing them or spraying them with dormant horticultural oils to control overwintering adult aphids and eggs. Treating or eliminating the source may mean possibly not having to treat the hops with an insecticide.
  • Adult spider mites often arrive in masse from nearby crops like soybeans and hayfields.  Watch  agricultural scouting reports if beans are grown in your area and when hay is being cut nearby.  Use a good contact control to keep them in check before they lay the next generation of eggs and nymphs. Once mites establish an egg-laying cycle they multiply quickly and multiple treatments are required to control them.  A new generation of mite can occur in as little as every 5 to 7 days.
  • Broad spectrum insecticides  can really impact the beneficial population  of natural insect predators. Broad spectrum insecticides are  often applied during the growing season as a good control for aphids, leafhoppers, beetles, and caterpillars.  Read all labels fully to understand the side effects. Use approved pesticides that target the specific pest whenever possible.
  • Don’t overlook pests like soil nematodes, weevils and corn borers.  These pests can do substantial hidden long-term damage in a hopyard and are very common in many regions.  Inspect suspect hop root systems and bines on a regular schedule during the growing season. Most nematode species go through two cycles per season and can be hard to diagnose during off-cycle times of the year. Highest populations of  root knot nematodes occur in July and August. Dagger nematode populations are at their highest in the spring. If the long-snouted adult weevils are seen feeding on the leaves, it is safe to assume that the immature grub stage is feeding like Bugs Bunny on the hop roots. Corn borers first instar stage is often on tall grasses in and around the hopyard, so controlling grasses and mowing can really limit them.

​Over Wintering Hops in a Commercial Hopyard (Back To Top)

In many regions dormant hop crowns left exposed during the winter months suffer crown and bud damage and loss to winter freeze-thaw cycles and desiccation.  The fix is simple – cover them with a shallow layer of field soil a minimum of 1 to 2 inches deep. This will act as a buffer against freeze-thaw cycles and provides moisture to prevent bud desiccation.  Hop growers that hill the hop rows during the season are automatically covered by this practice.
  • It is a good practice to apply some high potassium fertilizer post-harvest.  It will improve disease resistance and help provide protection from freeze damage during the winter.
  • Do not cover dormant hop crowns with heavy wet mulches or manures.  This will cause crown rot to set in and very high losses of plants can occur.
  • Set new plantings of hop transplants deeply enough to cover the crown. ​Exposed crowns can also be pushed up by frost cycles in some soil types.

​Hopyard Site Selection (Back To Top)

Hops in general, prefer slightly acidic, well-drained sandy loam soils pH 6.2 -6.8. The farther the site’s soil deviates from this, the harder hops will be to grow and suitable hop cultivar selection will be narrowed.
  • If a hopyard is planned for a site that had exposure to Atrazine herbicide (think old cornfields) a deep subsoil test should be done prior to proceeding any further.  There is no cure for residual atrazine as its half-life is 25 years or more.  Hops have deep permanent roots that can take up atrazine found locked in deep soil profiles and hardpans. (Don’t confuse the annual shallow feeder root mat with deep permanent mineral roots. Hops have both.)
  • Fields with seasonal water tables higher than 18 inches below the surface are poor hopyard sites.  Hops have deep root systems.   These sites will require field tiling.
  • Old alfalfa fields can carry levels of Verticillium.  This hop pathogen has no controls and kills certain varieties of susceptible hops. 
  • Old orchard ground can harbor nematodes, garden symphylans, and Armillaria / Verticillium root rots. Old decaying tree roots harbor these pests and pathogens. 

​Mulches and Composts (Back To Top)

Mulches and composts are different from each other.  Mulches are surface applied organic matter that may not be decomposed.  Examples would be leaves, wood chips, shredded bark, alfalfa hay, straw, and etcetera.  Composts are fully decomposed forms of mulches and manures with a stable carbon to nitrogen ratio.  Properly prepared composts go thru a high temperature phase which kills harmful pathogens and weed seeds.  Mulches do not and can be sources of pathogen if not selected carefully.
  • Mulches suck up available nitrogen as they decompose.  Extra nitrogen has to be applied to compensate. Wood chips in particular remove a lot of nitrogen.
  • Composts originating from woody products are more beneficial for acid loving hop varieties. The woody matter encourages the types of beneficial soil fungi species these hops prefer. Hops with German heritage would be included.
  • Composts originating from poultry manures are beneficial for building poor sandy mineral soil and hops that prefer more neutral or higher soil pH levels. Hops with English heritage do well on soils amended with poultry manure.
  • Some compost products, like fresh mushroom compost, can have excessively high levels of unwanted salts.  These salts can add to soil compaction issues, block other nutrients, and damage sensitive hop feeder roots.  Check composts for levels of salts, and age or leach accordingly.
  • Wood chips derived from diseased deciduous trees such as oaks and maples can carry infective Verticillium and other hop pathogens.  It is advised not to use coarse hardwood chips or bark in a hopyard unless they are fully composted.  Pine bark, needles, and wood chips are OK to use because they contain terpene compounds which these pathogens cannot survive in.
  • Do not place heavy deep layers of mulch or compost over hop crowns. Put it around the plants.
  • Heavy application of mulches can slow down soil microbial activity.
  • Heavy surface applications of mulch can serve as hiding places for pests.  Slugs, symphylans, and weevils in particular.
  • Don’t use plastic mulch covers in a commercial hopyard.  The reasons why were described earlier in the weed management discussion points.
  • Do not apply any harvest bine waste back into the hopyard unless it is fully composted and incorporated into the soil after application.  Hop pathogens and pests can reside and overwinter in hop harvest waste.  Do not let hopyard waste linger at a hopyard site.  Either compost the waste pile or remove it from the site.

​Cutting, Mowing, and Carping of Hop Crowns and Bines (Back To Top)

Picture
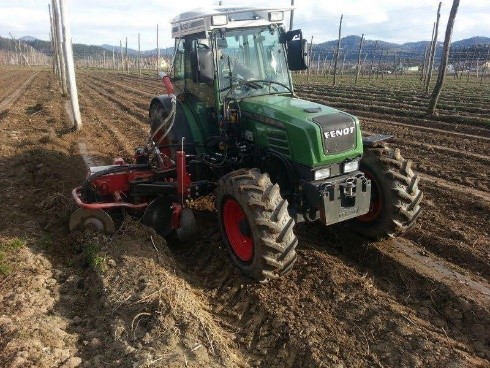
This is a topic with much discussion amongst new hop growers. There are several points to be made and the final benefits are still being debated. In regions like the Pacific Northwest where spring may begin in late February and bine training dates are not until mid-May,  the hopyards may be mowed several times to keep bine growth under control. The debate is about if hop growers in other regions with shorter spring times would have any benefits from mowing hops once more before training; or if the recovery time left before cone initiation is too short.


​
  • In the spring, removing the first early emerging hop shoots is often practiced.  (Do not confuse this field operation with later mowing hops again to achieve a particular training date). These early “bull “shoots are not the best bines to train and are removed by cutting them just above the crown structure and remaining secondary buds. This practice also removes any early mildew infected shoots.  Growers using a hilling practice find that the hop crowns form more upright shoots and shorter rhizome structure.  This results in denser, tighter crowns with easier rhizome control and more selectable bines closer to the string for training.
  • In hopyards where row hilling practices are not used the rows are simply mowed when the first shoots are about a foot high.  This is timed by variety; as some hop varieties emerge much sooner than others.  In general, it is noted that early maturity varieties tend to emerge before later-maturing types.
  • In hop rows that use soil-hilling practices, as the first bull shoots emerge from the top of last season’s hill; the grower has to dig down and determine how much of the dirt hill and shoots can be removed without scalping the hop crown structure off.   If too much of the hop crown is removed, only roots will remain and the hops will not re-sprout unless deeper stray rhizomes are left. Most growers using the row hilling technique set the carping (cutting) height about 1 inch above the crown bud height.  Experienced hop growers often plant new hop acreage with the new hop crowns lower than surrounding field height to ensure the crowns cannot be accidentally scalped off during the spring preparation of the hop rows.
  • It takes between four to six weeks for a cut hop to recover and regrow the 12 internode leaf sets needed to accept the long day length signal that initiates burr formation. If another mowing to set a specific bine training date is done later than four weeks prior to the summer solstice, (when day lengths start getting shorter); there is a risk some hop varieties will not form a full potential amount of cones.  Some hop varieties initiate burrs early in the season, and others initiate late.  In general, the later the maturity date; the later the cutting date can be. Cutting early maturing types too close to the solstice of results in little or no cones being produced. There is no concise information currently available to help determine best mowing and training dates for many hop varieties grown outside the Pacific Northwest region.  In the PNW states, large blocks of hops are often trimmed sequentially to stagger harvesting dates.  This helps spread out the hop harvest by keeping too many acres of hops from becoming ripe simultaneously and overwhelming the picking and oasting equipment.
  • Some hop varieties should not be cut multiple times.  Older noble-type hops (Saaz, Hallertauer, Goldings, etc.) are not vigorous enough to recover quickly enough to meet cone initiation dates. These older varieties also tend to be less tolerating of high temperatures during cone set and will shut down during hot weather. Late cutting dates tend to move the cone initiation into later summer with little or no cones being produced.   In general; the newer hybrid hops are much more vigorous and recover much more quickly. Cutting dates a week apart on a vigorous hop variety will stagger the harvest maturity dates by an average of 10 days to two weeks.
  • At harvest time cut the mature hop bines off at about a two to three foot height. Leave the remaining bine to die back naturally and be killed by frosts. This will allow carbohydrates and sugars to translocate down into the hop crown and strengthen it.  Once the bines have died back completely in late fall they can then be cut shorter or left until spring cleanup. Cutting the older noble-type hops too low, or before the sugars have translocated to the roots will cause following seasonal loss of vigor and gradual decline. Noble hop varieties like Saaz and Star can be killed within 3 or 4 seasons with improper post- harvest care practices.

Share

Comments
Details
    Picture
    click here HOPS DOCS Collection - valuable info we find to share

    Blog Author

    Lynn, the head hop grower at Great Lakes Hops has over 30 years of experience in the horticultural field. Browse the blog articles here to find useful growing information for humulus lupulus, based on personal experience and observations at Great Lakes Hops.

    Archives

    January 2020
    December 2019
    November 2019
    September 2019
    July 2019
    April 2019
    July 2013
    May 2013
    February 2013
    December 2012
    November 2011
    October 2011
    September 2011

    Categories

    All
    Beer
    Bines
    Cholorine
    Fertilizer
    Fungicides
    Hops
    Hopyards
    Insecticides
    Pesticides
    Profiles
    Pruning
    Soil Testing
    Temperatures

    RSS Feed

​About Us​ - Contact - Employment​  © 2011 - 2019 Dutch Touch Growers, Inc.
  • Home
  • Retail - Shop Now
  • Select Hops
    • Select Hops Program
    • Hop Sensory
    • Brew Group
    • Aztec™
    • Hydra™
    • Paradigm™
    • Bergamot™
    • Emerald Spire™
    • Gemini™
    • Mackinac™
    • Michigan Copper™
  • Select Hop Locator
  • Commercial Ordering
    • USDA Exclusive Hop Varieties >
      • Triumph
    • Availability
    • Commercial Contact
  • Hops Blog
  • Hops DOCS
  • FAQ